Are your marketing platforms showing incomplete or missing data? You’re not alone. Modern privacy protections like consent managers, ad blockers, and browser tracking restrictions can block up to 40% of your valuable marketing data.
The Hidden Data Gap
Common data blockers include:
– Strict cookie consent management systems
– Browser privacy features (Safari ITP, Firefox ETP)
– Popular ad blockers (uBlock, Ghostery)
– Network-level filtering
The Server-Side Solution
Google Tag Manager’s server-side implementation solves these challenges by:
1. Bypassing client-side blockers through first-party data collection
2. Maintaining data accuracy despite browser restrictions
3. Improving page performance by reducing client-side scripts
What You’ll Learn
This guide will walk you through:
1. Provisioning a secure server on Stape.io
2. Configuring your server container for optimal data collection
3. Integrating with Google Analytics 4 for complete data visibility
4. Setting up proper data routing for all your marketing tools
By implementing server-side tagging, you’ll regain control of your data pipeline while respecting user privacy preferences – ensuring you never make marketing decisions based on incomplete data again.
Prerequisites
Google Tag Manager account
Stape.io account (free tier available)
Website with GTM already implemented client-side
Basic understanding of GTM concepts
Step 1: Set Up Your Stape Account
Go to Stape.io and sign up for an account

Verify your email address

Log in to your Stape dashboard
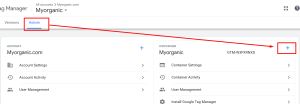
Step 2: Create a Server Container in GTM
Go to your Google Tag Manager account
Click “Admin” in the top navigation
Under “Container”, click “+ Create Container”
Select “Server” as the container type
Name your container (e.g., “Server Container”)
Click “Create”
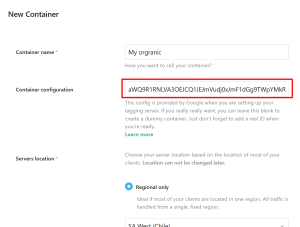
Step 3: Configure the Server Container in GTM
In your new server container, click “Server Container Settings” under Admin
Note the “Container ID” (format: GTM-XXXXXXX)
Set the “Manually provision tagging server” to “Enabled”

Step 4: Set Up the Server Container in Stape
In your Stape dashboard, click “Create GTM Server”
Enter a name for your server (e.g., your domain name)
Paste your GTM server container configuration Code (from Step 3)
Select a region closest to your audience
Click “Create Server”
Step 5: Configure Your Domain in Stape
Once created, click on your server in Stape
Under “Domains”, click “Add Domain”
Enter your domain (e.g., data.yourdomain.com)
Click “Save”
Note the CNAME record provided by Stape (you’ll need this for DNS setup)
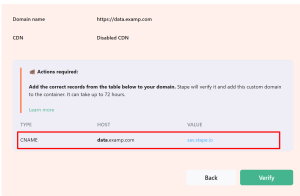
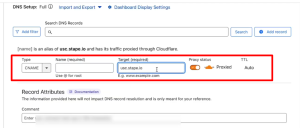
Step 6: Update Your DNS Records
Go to your domain registrar or DNS provider
Add a new CNAME record with:
Name: data (or your preferred subdomain)
Value: The CNAME provided by Stape
TTL: Default or as recommended
Save the DNS changes (note: propagation may take up to 48 hours)
Step 7: Verify DNS Configuration
Once DNS propagates, go back to Stape
Click “Verify” next to your domain
If successful, the status will change to “Active”
Step 8: Configure Client-Side GTM
Go to your website’s GTM container (client-side)
Create a new tag with type “Google Tag from Google analytics”
Configure the tag:
Tag ID: Your GA4 measurement ID (G-XXXXXXX)
Tag Firing Options: Once per page
Server_container_URL: https://data.yourdomain.com (or your Stape domain)
Set the trigger to fire on “All Pages”
Save and publish the container
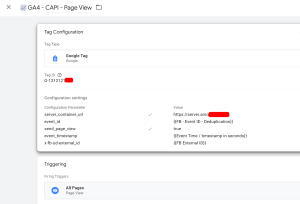
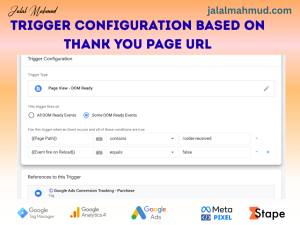
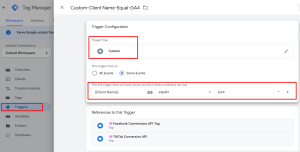
Step 9: Set Up Server-Side Tags
In your GTM server container, go to “Tags”
Create tags for the events you want to track (e.g., GA4, Facebook Pixel)
For GA4:
Create a “Google Analytics: GA4” client
Create a “GA4 Event” tag that uses this client
Set trigger using Custom trigger.
Step 10: Test Your Setup
Use Google Tag Assistant or browser developer tools
Verify that requests are being sent to your Stape domain
Check the “Preview” mode in GTM server container
Validate that data appears in your analytics platforms
Step 11: Go Live
Once testing is complete, publish both containers:
Your website’s client-side container
Your server container
Monitor your analytics to ensure data is flowing correctly