Tired of basic Shopify reports? Learn how to track your Shopify store revenue with Google Tag Manager for accurate, flexible e-commerce tracking in Google Analytics 4. Step-by-step guide inside.
As a Shopify store owner, you know that tracking revenue is your top priority. While Shopify provides basic reports, they often lack the depth and flexibility needed for advanced analysis. What if you could capture every transaction with pinpoint accuracy and send that data directly to Google Analytics 4, Facebook Pixel, and other marketing tools?
The answer lies in using Google Tag Manager (GTM).
In this comprehensive guide, we’ll show you exactly how to track Shopify store revenue with Google Tag Manager. We’ll break down the process into simple, manageable steps, empowering you to gain a clearer, more powerful view of your sales performance.
Prerequisites: What You’ll Need
- Google tag manager
- Google analytics 4
Step-by-Step: How to Track Shopify Revenue with GTM
We will use the native purchase event in GA4, which is specifically designed for tracking transactions. The key is to capture the data layer that Shopify pushes on the order confirmation page.
Step 1: Locate the Data Layer on Your Thank You Page
The data layer is a JavaScript object that holds information about the page. Shopify automatically pushes a rich ecommerce data layer after a successful purchase.
Step 2:
- From your Shopify Admin Dashboard, navigate to Settings → Customer events. In the top-right corner, click Add custom pixel to create a new custom pixel. Next, enter a title for the pixel and create it.
- In the Customer privacy settings section – For the Permission option, select Not required – The pixel will always run and for the Data sale option, choose Data collected does not qualify as data sale.
- Finally, click connect button in the top right corner to connect custom pixel.
Step 2: Create a Tag in Google Tag Manager
Now, we’ll tell GTM to listen for this purchase event and send the data to GA4.
-
Go to your Google Tag Manager workspace.
-
Click on Tags > New.
-
Click on Tag Configuration and choose Google Analytics: GA4 Event.
-
Configuration: Select your GA4 Configuration tag.
-
Event Name: Type
purchase. -
Ecommerce Data: This is the most important part. Click the “Use Data Layer” toggle. This tells GTM to automatically use the
ecommerceobject we saw in Step 1.
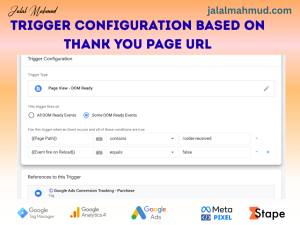
Step 3: Set the Trigger
The trigger tells the tag when to fire.
-
Click on Triggering and then the + button.
-
Choose the trigger type Custom Event.
-
Event Name:
purchase-
Wait, why not “purchase”? The event name in the trigger must match the
eventname in the data layer, which is"purchase".
-
-
Leave “Use regex matching” unchecked.
-
Click Save.
-
Name your tag (e.g., “GA4 – Purchase Event”) and click Save.
Step 4: Test Your Setup
Never skip this step! Use GTM’s Preview Mode to verify everything works.
-
In GTM, click Preview.
-
Enter your Shopify store’s URL. This will open a new browser tab.
-
Go through the checkout process until you reach the thank you page.
-
The GTM Preview console will appear at the bottom of your screen. You should see the
purchaseevent fire and the data associated with it. -
You can also go to Google Analytics Realtime reports to see if the purchase is being recorded.
Step 5: Publish Your Container
Once testing is successful, go back to your GTM workspace, click Submit, add a version name (e.g., “Added GA4 Purchase Tracking”), and click Publish.