If you want to measure your Fluent Forms submissions effectively for platforms like Google Analytics 4 (GA4), Google Ads, and Meta Pixel (Facebook Pixel), implementing tracking through Google Tag Manager (GTM) is a smart solution. Here’s a step-by-step guide to help you set up and track form submissions seamlessly.
Step 1: Set Up Google Tag Manager
Create a GTM Account and Container
- Navigate to .
- Click on Create Account, enter your account and container details, and select Web as the target platform.
- Once created, you’ll receive a container snippet. Copy the code.
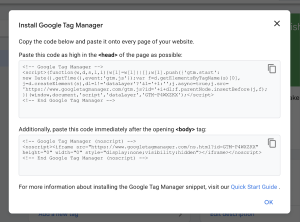
Install GTM on Your Website
- Insert the GTM container code into the
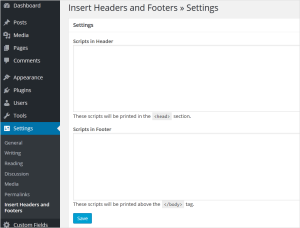
<head>and<body>sections of your website’s HTML. - For WordPress sites, you can use plugins like “Insert Headers and Footers” to add the GTM code.
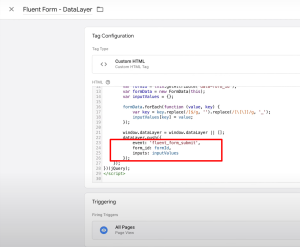
Step 2: Implement Data Layer in Fluent Forms
Set up a custom HTML tag to fire data layer events with form field when the form is Submitted and reach to Thank you page successfully.
Tag type: Custom HTML
Trigger: All pages (that the form is on)
Step 3: Test Your Implementation
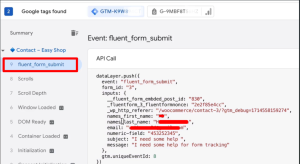
- Enable Preview Mode in GTM to test your setup.
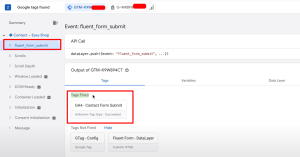
- Submit a Fluent Form on your website and check if the Submission event is fired in the GTM datalayer.
Step 4: Configure Tags in Google Tag Manager
Set Up GA4 Tracking
- Create a New Tag: Go to Tags and click New. Name your tag.
- Tag Configuration: Select Google Analytics: GA4 Event.
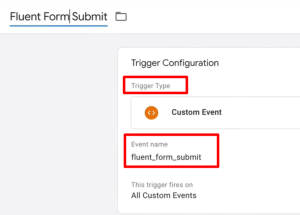
- Configure Tag: Enter your GA4 Measurement ID. Set the Event Name to
fluentFormSubmission(or your custom event name). - Trigger: Set the trigger to fire when the
fluentFormSubmissionevent occurs. Choose custom event trigger type and create event with “fluent for submit” - Save and Publish: Save the tag and publish your container.
![]()
Set Up Google Ads Conversion Tracking
- Create a New Tag: Go to Tags and click New. Name your tag.
- Tag Configuration: Select Google Ads Conversion Tracking.
- Configure Tag: Enter your Conversion ID and Label.
- Trigger: Set the trigger to fire when the
fluentFormSubmissionevent occurs. Sane as GA4 Trigger - Save and Publish: Save the tag and publish your container.
Step 5: Check Analytics and Ads Platforms
- Verify in GA4’s Realtime Reports or debug view to see if form submissions are recorded.
- Check Google Ads and Meta Ads dashboards to ensure conversion tracking is working as expected.
Conclusion
After verifying that everything works as expected, you can confidently publish the changes to a live environment.
You can also leverage the same events and variables in other tags, such as Google Ads, Microsoft Ads, Meta, LinkedIn, and more, to track events back to various media platforms.
Feel free to reach out if you have any questions or if there are other topics you’d like to explore. I’m here to help!