Are you looking to gather more precise conversion data to improve your targeted ads?
By setting up Google Ads enhanced conversions through Google Tag Manager with a conversion tag, you can optimize the conversion tracking of your campaigns.
In this guide, we will walk you through the process of implementing Enhanced Conversion Tracking using Google Tag Manager.
Here’s what we’ll cover:
- Understanding Enhanced Conversions
- User Identification Methods
- Conducting a Test Purchase
- Configuring Data Layer Variables
- Verifying Enhanced Conversion Setup
- Google Ads Configuration
Let’s get started on enhancing your conversion tracking!
Create a Conversion Action in Google Ads
- Log in to Google Ads: Go to your Google Ads account.
- Navigate to Conversions: Click on the Goals icon and then Conversions.
- Create a New Conversion Action: Click on New conversion action.
- Set Up Conversion Action: Choose the type of conversion you want to track (e.g., purchase, lead, sign-up). Enter the necessary details such as conversion name, category, value, and count.
- Enable Enhanced Conversions: If available, enable Enhanced Conversions for more accurate tracking.

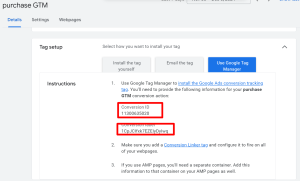
Copy Conversion ID and Label: Once you create the conversion action, you will get a Conversion ID and Conversion Label. Copy these details as you will need them for setting up the tag in GTM
Identify User Data
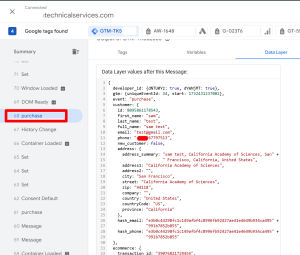
Identify the user data you want to capture, such as email addresses, phone numbers, or full names. This data will be used to enhance your conversion tracking
Create Data Layer Variables in GTM
- Log in to GTM: Go to your Google Tag Manager account.
- Navigate to Variables: Click on Variables in the left-hand menu.
- Create New Variables: Click on New under the User-Defined Variables section.
- Configure Data Layer Variables: Choose Data Layer Variable and enter the name of the variable as defined in your website code. For example, for an email address, you might name it
DLV - Email

Set Up Google Tag Manager (GTM)
- Log in to GTM: Go to your Google Tag Manager account.
- Create a New Tag: Click on Tags > New.
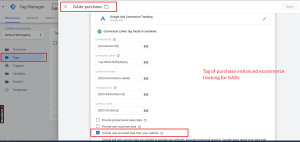
- Choose Tag Type: Select Google Ads Conversion Tracking.
- Enter Conversion ID and Label: Enter the Conversion ID and Conversion Label you copied from Google Ads.
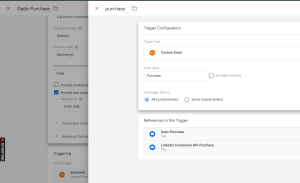
- Set Up Trigger: Create a trigger to fire the tag on the relevant page (e.g., thank you page after a purchase
Test and Validate
- GTM Preview Mode: Enter GTM’s Preview Mode and test the setup by completing a purchase on your website.
- Use Extensions: Use browser extensions like the Facebook Pixel Helper, GA Debugger, and Google Tag Assistant to verify the events.
- Check Analytics Platforms: In the respective dashboards (Facebook Events Manager, GA4, Google Ads), ensure the purchase events are being recorded accurately.
Step 7: Publish Your Container
- Publish Changes: Once you’ve confirmed that everything is working correctly, publish your GTM container to make the changes live.
- Monitor Performance: Regularly monitor the performance of your events and match quality in all analytics platforms
By following these steps, you will be able to set up Enhanced Conversions for Google Ads using Google Tag Manager, providing more accurate conversion data and unlocking more powerful bidding strategies
If you have any questions or need further assistance, feel free to ask! 😊